How to Apply Salmon PDRN Microneedle Patches: Step-by-Step Protocol
The complete application protocol for Cleanical Lab dissolving microneedle patches. Step-by-step instructions, timing, the 72-hour interval, and post-treatment care.
How to Apply Salmon PDRN Microneedle Patches: A Step-by-Step Guide
Dissolving microneedle patches represent a significant advancement in targeted delivery for periorbital skin concerns. Each Cleanical Lab patch carries a Salmon PDRN bio-active formulation within dissolving microneedles, designed to dissolve into the skin and deliver the formulation directly where it is applied.
However, the performance of any microneedle system depends heavily on correct application technique. Improper placement, insufficient contact time, or poor skin preparation can dramatically reduce how much of the formulation is delivered to the target area.
This guide provides a complete, step-by-step protocol for applying the patches — from skin preparation through post-treatment care — along with the structured 5-application course to help you follow the system as designed.
The full packaging instructions — sachet handling, application, and what to expect — are on the How to use page, the same multilingual guide the code on your sachet opens.
---
1. Cleanse — Start With a Clean Canvas
Before applying microneedle patches, thoroughly cleanse the treatment area to remove all traces of makeup, sunscreen, sebum, and residual skincare product.
Any barrier on the skin surface — whether oil, foundation, or moisturizer — can interfere with the contact of the patch and prevent the microstructures from engaging the skin directly. This directly reduces the volume of formulation delivered.
What to do:
1. Use a gentle, non-foaming cleanser or a dedicated eye makeup remover.
2. Cleanse the entire treatment zone — for example the under-eye area, the orbital bone, and the inner canthus (near the tear duct) — or the wrinkle zone you are targeting (forehead, crow's feet, nasolabial folds).
3. If you have been wearing heavy makeup or sunscreen, consider a double cleanse: an oil-based cleanser first, followed by a gentle water-based cleanser.
4. Rinse thoroughly with lukewarm water. Avoid hot water, which can increase skin sensitivity before patch application.
Why it matters: Clean skin ensures maximum patch contact and unobstructed microstructure engagement. Skipping this step is one of the most common reasons users see suboptimal results.
---
2. Dry — Ensure a Completely Dry Surface
After cleansing, the treatment area must be completely dry before patch application. Moisture on the skin surface can compromise the patch backing and may cause the microstructures to begin dissolving prematurely, before they have engaged the skin.
What to do:
1. Gently pat the area with a clean, dry towel or lint-free tissue. Do not rub — the skin around the eyes is the thinnest on the body and is easily irritated.
2. Wait 60 seconds after patting dry to allow any residual ambient moisture to evaporate.
3. Do not apply toner, essence, serum, or any leave-on product at this stage. The skin should be bare and dry.
Why it matters: The dissolving microstructures are designed to engage intact, dry skin. A wet surface alters the dissolution kinetics and can cause the microstructures to lose their structural integrity before contact.
---
3. Peel — Remove the Patch From Its Packaging
Cleanical Lab patches are sealed in individual sterile pouches to preserve the integrity of the dissolving microstructures. Handle the patch carefully to avoid damaging the array.
What to do:
1. Open the pouch by tearing along the notched edge or cutting with clean scissors.
2. Remove the patch by holding it at the edges. Avoid touching the center of the patch where the microstructure array is located.
3. Peel away the protective backing film to expose the side with the microneedle array. The microstructures will appear as a slightly textured, matte surface.
4. Inspect the patch briefly. The microstructure area should appear uniform and intact. If the array looks damaged, flattened, or discolored, discard the patch and use a new one.
Why it matters: The dissolving microstructures are fragile before use. Pressing, bending, or touching the array can deform individual structures and reduce delivery performance.
---
4. Apply — Position the Patch on the Treatment Zone
Correct placement is essential for targeting the area where concerns are most concentrated — fine lines and crepey texture typically appear along the infraorbital region, the forehead, crow's feet, or the nasolabial folds.
What to do:
1. Using a mirror, position the patch so that the microneedle array faces down toward the skin.
2. For under-eye use, align the patch just below the lower lash line, with the narrower end toward the inner corner of the eye and the broader end toward the outer corner.
3. The microstructure array should rest on the area of greatest concern — typically where fine lines and creping are most visible.
4. Place the patch gently first, before pressing down. This allows you to adjust positioning if needed before the patch bonds.
Why it matters: Placement too close to the lash line risks irritation; placement too far below the orbital bone misses the target treatment zone. Aim for the infraorbital hollow.
---
5. Press — Secure the Microstructures Into the Skin
Once the patch is positioned, apply firm, even pressure to embed the microstructures into the skin. This is the critical step that initiates targeted delivery.
What to do:
1. Use your index finger or thumb to press down on the center of the patch where the microneedle array is located.
2. Apply steady, moderate pressure for 10–15 seconds. The microstructures are designed to engage the upper skin layers without pain.
3. Press across the entire array area, working from the center outward, to ensure the full microstructure array is in contact with the skin.
4. Smooth the border of the patch to ensure it lies flat with no lifted edges.
Why it matters: Uneven or insufficient pressure means some microstructures will not fully engage, resulting in inconsistent delivery. Complete contact across the full array is what ensures uniform delivery of the formulation.
---
6. Wait — Allow Time for the Microstructures to Dissolve
The dissolving microstructures release the Salmon PDRN bio-active formulation gradually upon contact with moisture within the skin. This process takes time — the microstructures do not deliver their payload instantly.
What to do:
1. Leave the patch in place for 2 to 4 hours, or ideally overnight.
2. During wear, avoid rubbing, pressing, or adjusting the patch. Do not apply additional skincare products on top of or around the patch during this time.
3. You may go about normal activities — reading, working, resting — as long as the patch remains undisturbed.
Why it matters: Removing the patch too early interrupts dissolution before the microstructures have fully released their payload. The wear window is 2 to 4 hours — the longer within that range, up to overnight, the more complete the dissolution.
For a detailed training schedule on building patch application into a structured protocol, see our protocol training guide.
---
7. Remove — Gently Peel Away the Patch
After the recommended wear time has elapsed, remove the patch carefully. The skin beneath may feel slightly different than surrounding areas — this is expected and will be addressed in the post-treatment step.
What to do:
1. Starting at the outer corner of the patch, lift the edge slowly.
2. Peel the patch away from the skin at a low angle, moving from the outer corner toward the inner corner. Do not pull upward sharply.
3. If the patch feels strongly bonded, hold the skin taut with one hand while peeling with the other to avoid stretching the delicate skin.
4. Discard the patch after a single use. Dissolving microneedle patches are not reusable — the microstructures have dissolved and cannot be reactivated.
Why it matters: Aggressive removal can irritate freshly treated skin. Gentle peeling protects the micro-channel sites that were just created and allows them to begin their natural recovery process.
---
8. Moisturize — Restore and Seal the Skin
Immediately after removal, the treated area benefits from gentle hydration and barrier support. The micro-channels created by the dissolved structures remain open for a short window, making this an ideal time to deliver complementary skincare.
What to do:
1. Apply a small amount of a gentle, fragrance-free moisturizer to the treated area. A pea-sized amount for both eyes is sufficient.
2. Pat the product in gently with your ring finger — the finger that applies the least pressure. Do not rub.
3. Avoid active ingredients such as retinol, exfoliating acids (AHA/BHA), or vitamin C for at least 12 hours after patch application. These can cause irritation when combined with fresh micro-channels.
4. Follow with sunscreen during your morning routine. The treated area may be slightly more sensitive to UV exposure for 24 hours.
Why it matters: Post-treatment hydration supports the skin barrier after each application. Avoiding strong actives prevents unnecessary irritation during the recovery window.
---
Timing and Frequency: The 72-Hour Protocol
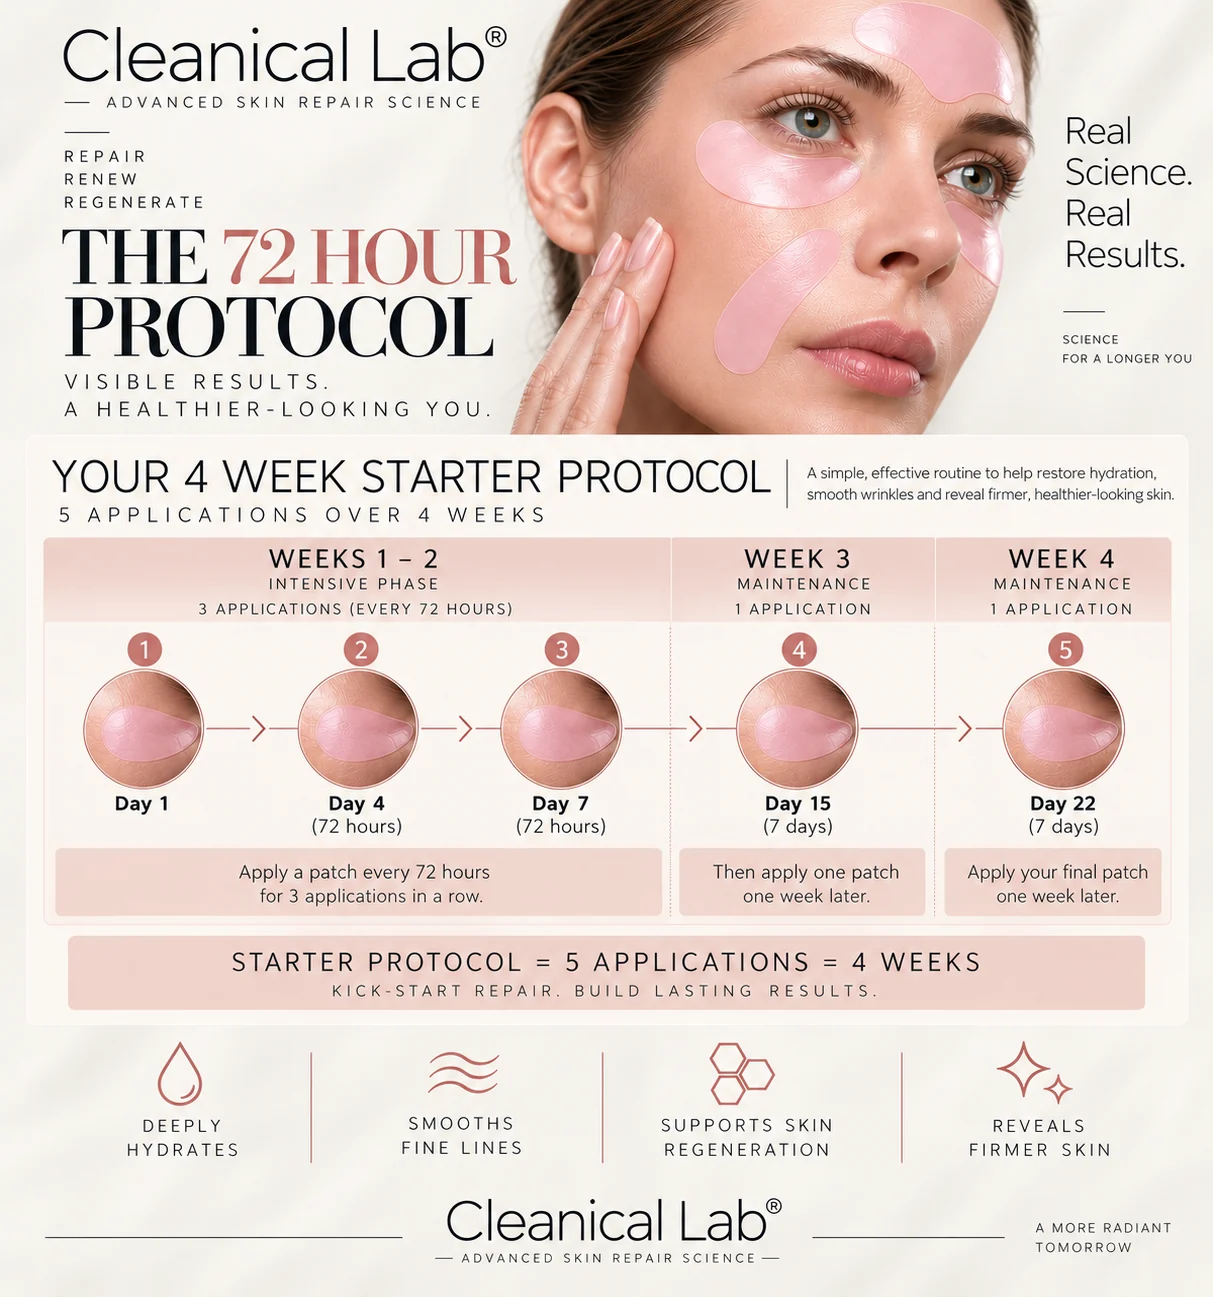
For consistent, protocol-driven results, follow the system as designed:
- Per-session wear time: 2 to 4 hours; overnight for optimal dissolution.
- Frequency: One application every 72 hours.
- Best time to apply: Evening, during rest or overnight. The skin's repair processes are most active at night, which complements the delivery window.
The system is designed as a defined course: one sachet equals one application, and five applications complete the protocol (the Starter Protocol contains 5 patches; the Full Protocol contains 10 — two complete courses). The packaging states visible improvement in 4 weeks* when the full protocol is completed.
---
What to Expect: Tingling, Redness, and Normal Sensations
Understanding what is normal helps you distinguish between expected application sensations and signs of irritation.
Mild tingling sensation: You may feel a light tingling or prickling when you first press the patch onto the skin. This is the microstructures making contact with the epidermis and is entirely expected. The sensation typically subsides within the first few minutes of wear.
Slight redness: A faint pink or flushed appearance in the treated area after removal is common. This is a localized, transient response to the micro-channels and usually fades within 30–60 minutes. It is not the same as an allergic reaction or irritation.
Firmness or tightness: Some users report a feeling of increased firmness or tightness in the treated area after removal. This is associated with the formulation integrating with the skin's own moisture.
When to be concerned: Discontinue use and consult a dermatologist if you experience persistent burning, swelling, hives, itching that does not subside, or redness that lasts more than 24 hours. These are not typical responses and may indicate a sensitivity reaction.
---
Post-Treatment Care
The hours following each application are when the skin benefits most from gentle support. Follow these practices:
1. Hydrate from within. Drink adequate water the day of and day after application — systemic hydration supports the skin barrier.
2. Gentle skincare only. For 12 hours post-application, use only gentle, fragrance-free products. Avoid retinoids, acids, and physical exfoliants.
3. Sun protection. Apply SPF 30 or higher the morning after an overnight application. The micro-channel sites are more receptive and also more vulnerable to UV.
4. No heat exposure. Avoid saunas, steam rooms, hot yoga, or prolonged hot showers for 12 hours after application. Heat can increase inflammation in the treated area.
5. Hands off. Avoid touching, rubbing, or massaging the treated area for several hours after removal. Let the micro-channels close undisturbed.
---
Common Mistakes to Avoid
Even with the best intentions, certain habits can undermine the effectiveness of dissolving microneedle patches. Avoid these common errors:
1. Applying to damp skin. Water on the skin surface causes premature dissolution of the microstructures. The treatment area must be completely dry before application.
2. Insufficient pressing. Lightly placing the patch without firm pressure leaves many of the microstructures unengaged. Press firmly and evenly for 10–15 seconds across the full array.
3. Removing the patch too early. Taking the patch off before the 2-hour minimum interrupts the dissolution process. If you cannot commit to 2 to 4 hours, wait until you can. Overnight is ideal.
4. Using actives immediately after. Applying retinol, vitamin C, or exfoliating acids right after removal can cause significant irritation through the fresh micro-channels. Wait at least 12 hours.
5. Applying off-protocol. The system is designed around one application every 72 hours — one sachet per application, five applications per course. Deviating from the interval undermines the protocol's design.
6. Reusing patches. Microneedle patches are single-use. The microstructures dissolve during wear — a used patch has no remaining delivery capacity.
7. Skipping post-treatment moisturizer. The skin needs hydration support after application. Skipping this step leaves the micro-channel sites without barrier support during recovery.
8. Poor patch storage. Store patches in a cool, dry place away from direct sunlight and humidity. Bathroom cabinets with high humidity can degrade the dissolving microstructures over time.
---
Frequently Asked Questions
Are microneedle patches painful?
No. The microstructures are designed to engage only the upper layers of the skin — the stratum corneum has no nerve endings. You may feel a mild tingling sensation during application, but the process is pain-free. Most users describe the experience as comfortable and unobtrusive, especially during overnight wear.
Can I use microneedle patches with my existing skincare routine?
Yes, with timing considerations. Apply the patches to clean, dry, bare skin. After removal, use only gentle, fragrance-free moisturizers for at least 12 hours. Resume your normal active ingredients (retinol, vitamin C, exfoliating acids) the following day. Do not layer actives on the same night as patch application.
How long until I see results?
The packaging states visible improvement in 4 weeks* when the full 5-application protocol is completed — one application every 72 hours. Individual results vary based on skin condition, consistency of application, and adherence to the protocol.
---
Cleanical Lab patches are designed for cosmetic use and are not intended to diagnose, treat, cure, or prevent any medical condition. If you have a known skin condition, are pregnant, or are under dermatological care, consult your physician before beginning any new skincare protocol.
Follow the Protocol
A defined course: five applications, every 72 hours, with the Salmon PDRN bio-active formulation in dissolving microneedles. The packaging states visible improvement in 4 weeks.*
Explore the Protocol →Related Research
Are Microneedle Patches Safe? Who Should Avoid Them
Dissolving microneedle patches are a cosmetic at-home system with a defined set of warnings. Who can use them, who should check first, what to expect.
Product & ApplicationWhere to Apply Microneedle Patches: The Key Wrinkle Zones
The system targets specific wrinkle zones, not the whole face. Here is where each patch goes — and why precise placement changes what the treatment does.